
Easy Chicken Biryani Recipe (Restaurant-Style!)
Chicken Biryani, Pakistani style! If there was ever a world-famous, spicy, and finger-licking good rice dish and chicken recipe, Chicken biryani is it! My super-easy, beginner-friendly recipe does not require tons of spices or a long and complicated process.
My uniquely authentic biryani rice recipe will provide you with simple steps and easy ingredients. Equally important, I’ll provide you with the tips and tricks you need to make fluffy basmati rice and tender chicken!
Above all else, you will love my straightforward and traditional Indian or Pakistani chicken biryani recipe. It’s spicy, tangy, and rich, with long strands of soft rice and juicy chicken.

To sum up, this recipe will become your ultimate biryani recipe for delicious restaurant-style chicken biryani! Simple and bursting with flavor.
About Chicken Biryani
The Sub-continent is overflowing with different biryani recipes. Some call for lots of different spices and herbs, indian cuisine, while others are simple and without much fuss. The truth is that there are many versions of biryani.
As a matter of fact, every state or city has a slightly different version of it. In general, traditional chicken biryani has roots in the Mughal era. Because the Mughals loved meat, they combined rice with meat gravy to produce this masterpiece!
To clarify, chicken biryani consists of perfectly boiled, fluffy white basmati rice and chicken cooked in delicious aromatic spices and spicy gravy also know as biryani korma masala. They are both added in layers to a large pan, which is covered and left to steam or ‘dum‘ to complete cooking; that’s why it is also called Chicken dum biryani or Spiced Chicken Rice. The result is a delicious rice and chicken dish which has remained in the Subcontinent for decades! It is a markedly famous and beloved dish in every home.
Why this Chicken Biryani Recipe
- Crowd Pleaser: My biryani recipe can feed a party! It’s very easy to double or triple this recipe to make it for a party. As a matter of fact, it’s recommended! Leftover biryani eaten the next day is absolute heaven!
- A Universal Favorite: There isn’t a home in the Subcontinent where traditional chicken biryani has not been made or eaten. Moreover, it’s a dish for special occasions or weekend cooking. Its popularity has reached several other nations, too. As a result, it’s become a hit!
- A Complete Meal: Chicken biryani is a complete meal in itself. You can serve it with a green salad or, more popularly, a yogurt raita. But even if you don’t have any of these side dishes, biryani is complete on its own.
- Asian Comfort Food: Chicken biryani is the ultimate Asian comfort food. When you need a wholesome, satisfying, home-cooked meal that hits the spot, Chicken biryani is the way to go!
Ingredients
Here are the ingredients you will need to make authentic Chicken Biryani.
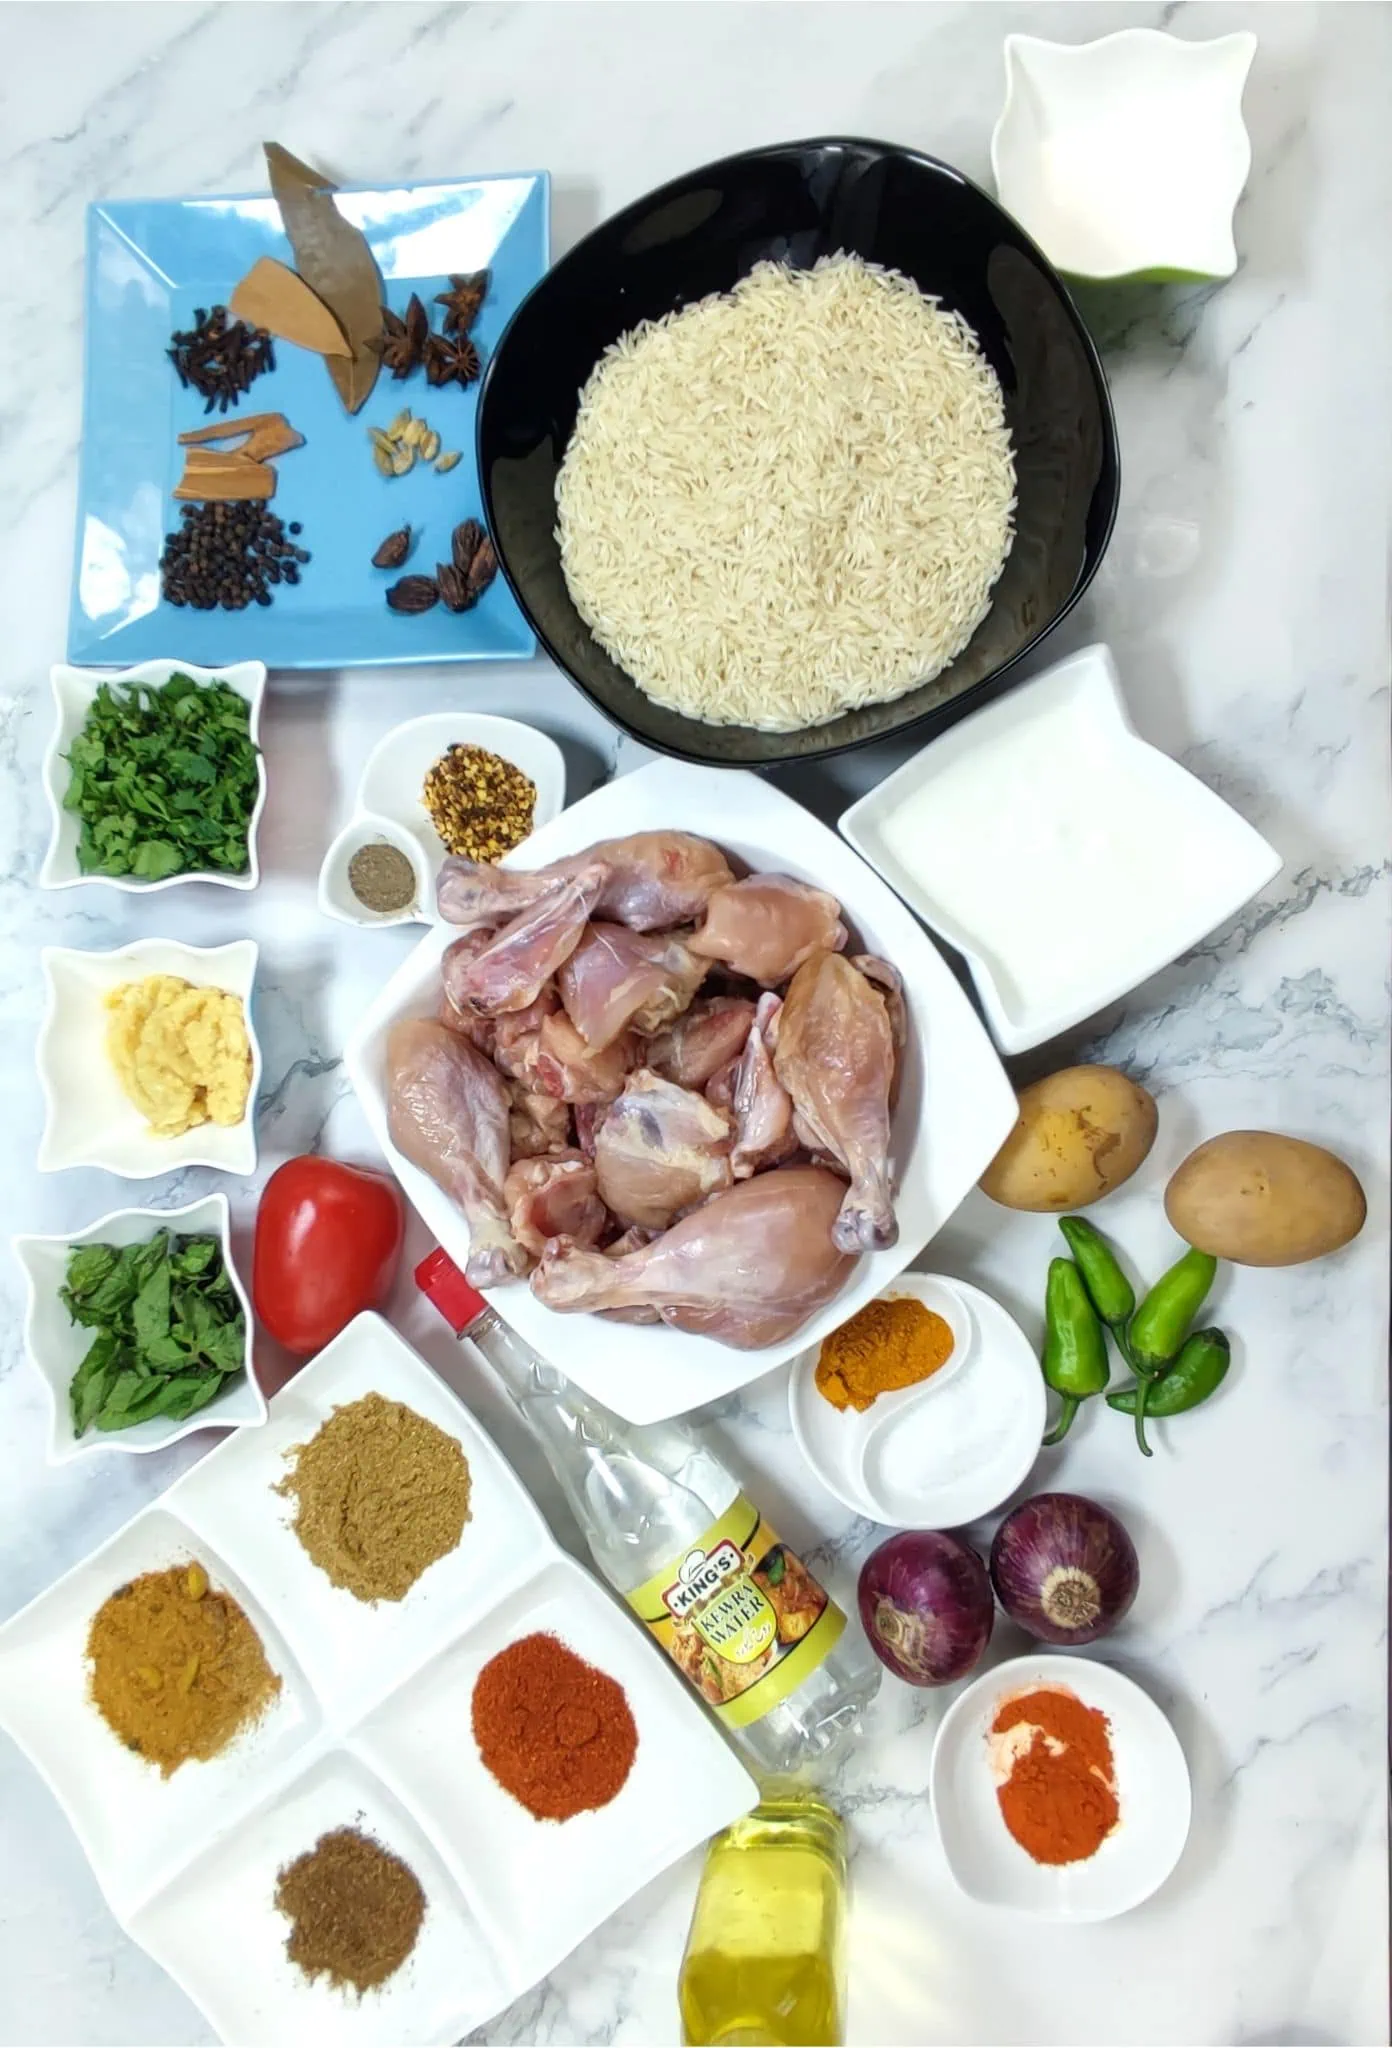
- Rice: Traditional chicken biryani is made using Basmati rice, but, by all means, you can also use Sella rice. However, I have used Basmati for its long, tender grains.
- Chicken: The protein of choice for my family is always chicken! However, you can use mutton or beef. Consequently, the cooking time will increase if you use either of these meats.
- Potatoes: There is an age-old debate about whether potatoes belong in chicken biryani or not! Some people love potatoes in biryani, while others believe it’s horrific! I leave the choice up to you, but I like adding potatoes to my recipe.
- Yogurt: Adding yogurt to the chicken gravy gives the biryani a delicious tangy flavor, and helps make the meat tender.
- Onion & Tomatoes: As always, onions and tomatoes form the base of every Indian gravy.
- Spices & Aromatics: There are a handful of spices that go into chicken biryani, however, do not panic, because they are quite common, and if you love Chicken Biryani Recipe Indian cooking, you probably already have them in your kitchen. I use both crushed and whole masalas.
- Biryani masala: In this recipe, I use my own masala in combination with 2 tablespoon pre-made biryani masala. But, if you can’t find it nearby, or don’t like using it, you can skip it.
For quantities, view the recipe card below.
Instructions
Now, simply follow my instructions for the best spicy Chicken Biryani!
Preparing the Chicken Gravy/Chicken Korma
First, heat the oil in a large pan. Add the sliced onion and fry until it becomes golden brown.

- Preheat the pan and add oil.

- Add the sliced onions and saute.
Next, add the whole garam masala, or the whole spices and fry them for 1 minute. This helps release their aroma and flavor.

- Once the onions become light golden, add whole garam masala starting with 3 big elaichi.

- 8 to 10 whole black pepper corns.

- 2 Dar Cheeni sticks or Cinnamon & 4 to 5 long (cloves).

- 1 taiz patta ( Bay leave) & 2 Badiyan ka Phool (Star Arise). Now stir it thoroughly so the onion and whole garam masala are mixed well. In this process, the onion is also fried further.
Now, add the ginger garlic paste and saute for a few seconds.

- Now add ginger garlic paste. (You can get my homemade ginger garlic paste recipe here)

- Saute the ginger and garlic on medium-low flame.
Add the chopped tomatoes, followed by 1 cup water, salt, red chili powder, turmeric powder, coriander powder, cumin powder, garam masala powder, and biryani masala. Cover and let the gravy cook for 20 minutes.

- Next, add the chopped add tomatoes

- Stir everything together. I usually use a wooden spoon for mixing. Add 1 cup of water

- Let it cook on medium-low flame.

- Now, start adding spices. Add salt.

- Haldi (turmeric) powder.

- Add Kuti mirchi (Crushed Chillies).

- Add Garam masala powder.

- Add red chilli powder.

- Add coriander powder and zeera powder.

- You can also add Biryani masala for extra aroma and taste.
Add another half a cup of water. We added 1 and 1/2 cups of water. Place the lid to cover, and let it cook on medium flame.

- Now add half a cup of water.

- Cover and cook it for 20 minutes

- After 20 minutes, the oil will separate from the gravy.

- Gently mash the masala.
Next, add the chicken pieces and saute on high flame for 2 minutes.

- Now add the chicken to biryani masala. You don’t need to add any water as the chicken will release its moisture.

- Saute the chicken in masala for 2 minutes on high flame.
After the chicken has cooked on a high flame, cover the pan and cook it on a low flame for 10 minutes. Covering the pan allows the chicken to release its own water.

- Now, the chicken is sauteed and mixed well into masala.

- Cover and cook the chicken on low flame for 5-10 minutes, or till tender.

- After 10 minutes, stir the chicken. It is half done.

- Add 500 grams of whisked yogurt.
After 10 minutes, add the yogurt and cook for another 20-25 minutes until the chicken is tender. The gravy’s oil should also be separated at this stage.

- Mix it together on low flame.

- Stir well after adding yogurt to avoid lumps and overcooking.

- When the yogurt is well combined, set the flame on medium-high and cook till the chicken is tender.

- Cover and cook.

- After about 20-25 minutes of cooking the chicken is tender and the oil has separated from the masala.

- Add green chilies and fresh coriander leaves to garnish.
Add mint, coriander, and green chilies to the chicken masala. Cook for a further 3-4 minutes and remove from the stove.

- Partially cover the pan and cook for a further few minutes.

- Our biryani korma is now ready!
Making the Potatoes for Chicken Biryani
In the meantime, boil water in another saucepan and add the potatoes, along with a pinch of yellow food coloring and saffron. Boil until the potatoes are tender.

- Boil water in another saucepan and add the potatoes.

- Add a pinch of yellow food coloring.

- You can also add saffron to the boiling potatoes.

- The potatoes have turned orange and are still boiling in the water.

- Cover the pot with a lid.
Par Boiling Basmati Rice for Chicken Biryani

- Fill a large pot three-quarters of the way up with water.

- Add black peppercorn, black cardamom pods, green cardamom, cinnamon stick, star anise, and cloves to the water.
In a large pot, boil water and add whole black peppercorn, black cardamom pods, green cardamom, cinnamon stick, star anise, and cloves.

- The spices should be fully submerged in the water.

- Cover the pan with a lid and let the water come to a boil.

- Wash the rice well and then drain the water.

- Add salt to the water.

- Cover the pan with a lid.
Once the water comes to a rolling boil, add rice and boil them until ¾ done, then strain.

- The water is boiling now.

- Add the washed rice to the boiled water.
Layering the Biryani

- In a large pot, heat 3-4 tbsp of oil.

- Add the rice to the oil.
In a large pot, heat 3-4 tbsp of oil.
Begin the biryani layers with a portion of rice, followed by a layer of chicken and potatoes. Repeat the layers twice.

- Layer the chicken korma over the boiled rice.

- Arrange the potatoes on top of the rice and chicken korma.

- Add another layer of cooked rice on top of the chicken korma and potatoes.

- Add another layer of chicken korma on top of the rice. Repeat these layers till you have no more rice or chicken left.
Add mint and coriander leaves on top.
Mix milk with yellow food color and drizzle over the top for that popular saffron yellow biryani color.

- Add mint and coriander leaves on top.

- Add boiled potato and a sprinkle of food coloring in biryani.
Sprinkle the kewra water on top for aroma.
Cover the pot, and place it on a low flame (dum or steam) for 15-20 minutes.

- Cover the pot with a lid. Now, let the biryani cook for a few minutes until the rice is tender and the flavors have blended.

- Uncover the pot and allow the steam to escape. Once the steam has escaped, fluff the biryani with a large spoon.

Serving the Biryani
Although biryani is a complete meal, it is popularly served with cold yogurt, mint raita, and a fresh green salad.

Hint:
If you feel that the rice is a little tough, sprinkle half a cup of water on top of the layers of the biryani before placing it on dum.
On the other hand, if you think the rice is soft, make sure to dry the chicken masala in order to remove any excess moisture before placing it on dum.
You can add extra green chilies in the layers and slices of tomatoes, fried brown onions, and lemon slices.
Variation
Biryani lovers know that biryani can be made using different meats. Although chicken is the most popular in Pakistan, foodies also enjoy mutton or beef biryani. Additionally, fish or shrimp biryani is also on the rise, especially in Karachi.
You can experiment with different meats. Furthermore, mutton or beef will take up to 2 hours to cook, or you could use the handy pressure cooker to reduce the cooking time to 15 minutes.
Fish or shrimp, on the other hand, will be tender in a matter of minutes.
Equipment
Here is the list of kitchen utensils I used to make chicken biryani:
- 1 large pan to make the chicken gravy
- 1 large pan to boil the rice
- 1 large pan to assemble and layer the biryani
- Measuring spoons
- Knife and chopping board
Top tips
- Always soak Basmati rice before boiling because this allows it to puff up and become tender.
- When boiling rice, keep a close eye on the clock to avoid overcooking it.
- It’s ok to omit a few of the whole spices in the recipe if you don’t have them on hand.
- If your rice gets overcooked while boiling, you must thoroughly dry the chicken masala by cooking it to remove excess moisture.
- If your rice is undercooked and tough, sprinkle half a cup of water on top of the layers to increase the moisture content.
- If you don’t have any yogurt, you can omit it. Yogurt helps to add a delicious tang and tenderize the chicken.
FAQ
Kewra water is sprinkled on top of the rice layer while the biryani is assembled. It adds an authentic biryani aroma to the dish. You can omit it if you don’t have any, or replace it with rose water.
Some of the essential ingredients to make a traditional biryani are: whole spices such as cardamom, cloves, Bay leaves, and star Anise. Yogurt is essential for making the meat juicy and tender, and Kewra water adds the ultimate biryani aroma.
Cook the chicken gravy until it’s dry. Reducing the amount of water in the gravy can reduce overall moisture to prevent the rice from becoming even softer. Also, when placing the biryani on the dum, don’t let it sit for too long. 5 minutes should be enough.
Chicken Biryani is a layered rice dish made with marinated chicken, aromatic spices, and fluffy basmati rice. It originated in Persia and is now a popular dish in India, Pakistan, and other parts of the world.There are two main methods for preparing biryani: kachi (raw) and pakki (cooked).
Aged, long-grain basmati rice is ideal for Chicken Biryani, as it results in fluffy, separate grains. It’s essential to use aged rice because it has a lower moisture content and therefore cooks more evenly. You can find this type of rice in Indian/Pakistani grocery stores or online. Sella basmati rice is another good option, as it is steamed in its husk and is less prone to becoming mushy.
Tender chicken is achieved through proper marination and cooking techniques. Marinate the chicken in a mixture of yogurt, spices, and herbs for at least 30 minutes, or ideally overnight, to tenderise the meat and infuse it with flavour. Bringing the chicken to room temperature before cooking ensures even cooking. Finally, simmer the chicken in the gravy over low heat until cooked through.
Dum” refers to the steaming process in biryani, where the layered pot is sealed tightly and cooked over low heat. This allows the rice to cook fully in the steam and absorb the flavours of the chicken, spices, and herbs. The dum process is crucial for achieving the authentic flavour and aroma of biryani. During dum, the steam infuses the rice, meat, and spices, creating a harmonious blend of tastes
Yes, you can use other meats like mutton, beef, fish, or shrimp to make biryani.Keep in mind that cooking times will vary depending on the type of meat. Mutton and beef will require longer cooking, while fish and shrimp cook quickly.You can also use boneless chicken, but it’s generally recommended to use bone-in chicken for more flavour.
Related
Looking for other recipes like this? Try these:


I know what I’m cooking fot dinner tonight! Great recipe!
Awesome! I’m so glad you found a recipe you love for dinner. Hope it turns out delicious!
I’ve never had chicken Biryani, but it sounds delicious. Thanks for the story behind it and the detailed recipe!
You’re very welcome! Chicken Biryani is such a flavorful dish—I’m glad you’re excited to try it. Enjoy making and tasting it!
I had chicken biryani a couple weeks ago. It was yummy. I’ll be sure to try this recipe.
That’s great to hear! Chicken Biryani is always a hit. I hope this recipe turns out just as tasty for you!
Now I know what I can make for dinner thanks for sharing!
You’re very welcome! I’m glad I could help you decide on dinner. Enjoy cooking and eating!
This look delicious. I will rather use coconut milk instead of yogurt. Just my preference.
This easy chicken biryani recipe looks so delicious! I will definitely be making this soon. Thanks so much for this recipe!
I’m so glad you like it! Chicken Biryani is such a tasty and comforting dish. I hope you enjoy making and eating it—let me know how it turns out!
This looks delicious! Thanks for sharing – Ash 🙂
You’re welcome, Ash! I’m so glad you think so. Hope you enjoy making and eating it!
I never had that before, but I would like to try it. Looks yummy and healthy eating!
Thanks! It’s definitely worth trying—tasty and good for you. Hope you enjoy it!
You’re very welcome! Let me know what you think once you try it. Enjoy and happy eating!
This is a recipe worth trying. It sounds so delicious.
That looks so delicious!
Looks and sounds delicious!
Thank you! I’m so glad you think so! Hope you get to try it soon! 🍗🍚
It looks wonderful! my problem is trying to get the chicken tender. I either cook it too long or not long enough.
Terrific post!
Thank you! For tender chicken, try cooking it on medium heat and use a meat thermometer to check the internal temperature (165°F). It helps avoid overcooking! Hope this tip helps, and happy cooking! 😊
Maybe I’m just hungry but just reading this got my mouth watering. Can’t wait to try!
That’s so sweet to hear! I hope you love it as much as I do. Let me know how it turns out! 😊
This dish looks beautiful and delicious!
Thank you! I’m so glad you like it. Let me know if you give it a try! 😊
This looks delicious!
Thank you! I hope you get a chance to try it and love it as much as we do! 😊
I love chicken recipes a lot! I can’t wait to try out this one. Looks delicious!
Same here! Chicken recipes are the best—this one looks so tasty and easy to make!
Such easy to follow instructions with photos for chicken biryani! My family loves it!